Using the GNU Visual Debugger
Version 1.2.5
Document revision level 1.55.2.12
Date: 2002/01/24 13:06:47
ACT-Europe
Table of Contents
Copyright (C) 2000-2001, ACT-Europe.
This document may be copied, in whole or in part, in any form or by any
means, as is or with alterations, provided that (1) alterations are clearly
marked as alterations and (2) this copyright notice is included
unmodified in any copy.
GVD is a graphical front-end for text-based debuggers such as GDB.
A knowledge of the basics of the underlying debugger used by GVD will help
understanding how GVD works and what kind of functionalities it provides.
Please refer to the debugger-specific documentation (e.g the GDB documentation)
for more details.
The purpose of a debugger such as GVD is to allow you to see what is going on
within another program while it executes, or what a program was doing
at the moment it crashed.
The menu bar provides operations that act either at a global level, or on
a specific debugger. Since GVD can handle multiple debuggers at the same
time, the commands that deal with debugging on a specific module always
use the current debugger to perform the various operations specified by the
menus. Key shortcuts are available for the most common operations, and
are displayed in the menus themselves.
Here is a detailed list of the menu items that can be found in the menu bar:
- Open Program...
-
Opens a file selection dialog that allows you to choose a program to
debug. The program to debug is either an executable for native debugging, or
a partially linked module for cross environments (e.g VxWorks).
Do not use this menu to edit a source file, see the section The Explorer Window,
or the section open source menu.
- New Debugger...
-
Opens a dialog to create a new debugger window. By default,
the Replace Current Debugger check button is active, and
the new debugger window will replace
the current debugger. Otherwise, it will be added in the main window as an
additional debugger.
This dialog allows you to specify the name of the executable to debug by
entering its name in the Program File entry, or by clicking on the
... button to open a file selection dialog. You can also select
the machine on which your underlying debugger (e.g GDB) will run. By default,
the debugger will run on the current machine (the machine on which GVD is
running), so you only need to specify a value if you want to do remote debugging.
For more information, see section Debugging a program remotely.
- Open Core Dump...
-
This will open a file selection dialog that allows you to debug a core file
instead of debugging a running process. Note that you must first specify an
executable to debug, by either using the section open program menu, or
by specifying the name of the executable on the command line (see section Command Line Options).
- Add Symbols...
-
Add the symbols from a given file/module. This corresponds to the gdb
command add-symbol-file. This menu is particularly useful under VxWorks
targets, where the modules can be loaded independently of the debugger.
For instance, if a module is loaded on the target while GVD is running,
it is absolutely required to use this functionality, otherwise GVD/gdb won't
be able to work properly.
- Edit Source
-
Launches an external editor that will open the file currently displayed
in the source window (see section The Source Window). You can specify the name of
the external editor by using the section preferences menu.
- Open Source...
-
Opens a file selection dialog that allows you to load any source file in the
source window. You can also directly open the source files used in your
application by using section The Explorer Window.
- Open Session...
-
Opens a dialog giving you the list of sessions that are saved in the
`$HOME/.gvd/sessions' directory on Unix systems, and
`%HOME%\.gvd\sessions' on Windows systems. The Session List area
lists all
such sessions. The Session field shows the current selection (which can
be specified either by entering the name on the keyboard, or by clicking in the
Session List window). The right area gives you a list of sub-sessions,
or of debuggers launched during a selected session. You can select any of the
debuggers of a specific session in order to replay one, some, or all of them.
To select the debuggers, either click on the check box on the left of each
item, or use the Select All and Unselect All buttons.
If you confirm by clicking on the OK button, GVD will open a new
debugger for each sub-session selected and will replay all the commands
automatically.
- Save Session As...
-
Opens a dialog similar to the Open Session dialog, allowing you to specify
the name of the session to save, and what sub-sessions/debuggers to save.
By default, this will save all the sub-sessions ran in GVD since start up.
- Attach To Process...
-
Instead of starting a program to debug, you can instead attach GVD to an
already running process. To do so, you need to specify the process id
of the process you want to debug. The process might be busy in an
infinite loop, or waiting for event processing. Note that as for
section core files, you need to specify an executable before attaching to a
process.
- Detach Process
-
Detaches the currently debugged process from the underlying debugger.
This means that the executable will continue to run outside GVD. You can use
the Attach To Process menu later to re-attach to this process.
- Change Directory...
-
Open a directory selection dialog to change the directory in the underlying
debugger. This is useful before executing a process, or when loading a
file using a relative path.
- Close
-
Closes the current debugger. If this is the only debugger, the main window
will remain visible, but with a gray area instead of the notebook containing
the Data, Explorer, Source and Debugger windows.
To create a new debugger, see also the section new debugger menu.
- Exit
-
Saves the window settings and exit GVD.
The only item currently available in this menu is the preferences menu.
Opens a dialog window allowing you to modify the global preferences of GVD.
To enable the new preferences, you simply need to confirm by pressing the
OK button. The preferences will be saved in a file located in
`$HOME/.gvd/preferences' on Unix systems, and
`%HOME%\.gvd\preferences' on Windows systems.
To simply test your changes, you can use the Test button. Pressing
the Cancel button will undo all your changes.
The preferences dialog is composed of five areas, accessible through the
tabs at the top of the dialog, labelled General, Source, Data,
Command, Memory, Helpers. Each page corresponds to a section of
preferences.
- General
-
Gives access to the general preferences in GVD.
- Break On Exceptions
-
Specifies whether a breakpoint on all exceptions should be set by default
when loading a program.
- Status Bar Time Out
-
Specifies the time interval after which a message in the status bar will
disappear. Messages that have disappeared can be displayed using the arrow
in the bottom left area of the main window.
- File Extensions
-
Indicates the filename extensions that are recognized for each of the
following supported languages: Ada, C, C++.
Each text entry is a semicolon separated list of filename extensions, e.g
.ads;.adb for Ada files.
- Source
-
You can modify the preferences for the Explorer, Source, and
Assembly windows, in particular the font and colors used to highlight
elements.
- Display Explorer Tree
-
Indicates whether the list of files should be displayed.
- File Name Background
-
Indicates the color used for the background of the file name in the editor.
This is also used for the background of the current frame in the Call Stack
window.
- Font
-
Indicates the font used in the editor.
- Show Line Numbers
-
Specifies whether line numbers should be displayed in the code editor.
- Show Lines with Code
-
Specifies whether dots should be displayed in the code editor for lines that
contain code.
- Automatic Display of Variables
-
Specifies whether tooltips should appear automatically to display the value
of the variable under the cursor.
- Syntax Highlighting
-
Indicates whether the editor should provide color highlighting.
- Strip Carriage Return
-
Indicates whether Carriage Return characters should be stripped when reading a
file. GVD tries to detect this automatically, but in some rare cases it can be
useful to enable this option manually.
- Comments
-
Indicates color to be used used for comments.
- Strings
-
Indicates color to be used for string literals.
- Keywords
-
Indicates color to be used for keywords.
- Current Line
-
Indicates color to be used for highlighting the current line in the editor
- Data
-
Lets you change the preferences of the Data Window, in particular
the fonts and colors used to display the data graphically.
- Clickable Item
-
Indicates color to be used for the items that are clickable (e.g pointers).
- Title Background
-
Indicates color to be used for the background of the title.
- Changed Data
-
Indicates color to be used to highlight fields that have changed since the last update.
- Auto-Refreshed
-
Indicates color to be used for auto-refreshed items.
- Frozen
-
Indicates color to be used for frozen items.
- Separate Window
-
Specifies whether the Data window should be a separate window.
- 3D Look
-
Specifies whether the items should have a 3d look.
- Item Name
-
Indicates font to be used for the name of the item.
- Item Value
-
Indicates font to be used to display the value of the item.
- Item Type
-
Indicates font to be used to display the type of the item.
- Hide Big Items
-
Specifies whether items larger than a given size will start in a hidden state.
- Big Item Height
-
Specifies that items taller than this value will start hidden.
- Detect Aliased (shared data structures)
-
If enabled, do not create new items when an item with the same address is
already present on the canvas.
- Display Grid Points
-
Specify whether the grid should be displayed in the canvas.
- Auto-Align Displays on Nearest Grid Point
-
Specify whether items should be aligned on the grid.
- Show Call Stack
-
Specify whether the Call Stack view should be shown in the data window.
- Command
-
Enables you to change the preferences of the Debugger Console, also
known as the Command Window.
- Color Highlighting
-
Sets the color used to highlight debugger commands and prompts.
- Font
-
Sets the font name and size for the Debugger Console. Note that it
is recommended to use a fixed size font such as Courier to get a better
looking display.
- Memory
-
Gives access to the preferences related to the memory view window.
The values are currently not taken into account.
- Font
-
Sets the font name and size to display the contents of the memory. It
is recommended that you use a fixed size font such as Courier to get a better
looking display.
- Default Color
-
Indicates the color to be used by default in the memory view window.
- Color Highlighting
-
Indicates the color to be used for highlighted items in the memory view.
- Selection
-
Indicates the color to be used for selected items in the memory view.
- Modified
-
Indicates the color to be used for modified items in the memory view.
- Helpers
-
Helpers are external programs that are used by GVD to perform specific
actions.
- Edit Sources
-
This command specifies the program used by the Edit Current Source menu.
This specification uses two special arguments:
%f which is replaced by the full path name to the current file,
and %l which is replaced by the current line number.
This specification is superseded by the environment variable
GVD_EDITOR if it exists (see also section GVD_EDITOR).
Try e.g using "xterm -e /bin/vi %f +%l" if you prefer vi.
- List Processes
-
This command generates a list of processes
suitable for process actions such as attach. Under Windows, a stand alone
executable called
winps is provided to implement this capability.
Note that the format expected by GVD of this command is the process id
in the first column, and then additional information (displayed as is).
- Remote Shell
-
Command to be used to establish a remote connection
(see section Using GVD with a Remote Debugger).
- Remote Copy
-
Command to be used to copy files remotely
(see section Using GVD with a Remote Debugger).
- HTML Browser
-
Command to be used to browse HTML files, in particular the HTML version of this
help file.
By default, GVD will reuse an existing netscape browser. You can force
the use of a new netscape by changing the "HTML browser" helper to
netscape -no-session-management
- Run/Start...
-
Opens a dialog window allowing you to specify the arguments to pass to the
program to be debugged, and whether this program should be stopped at the
beginning of the main subprogram. If you confirm by clicking on the OK
button, the program will be launched according to the arguments entered.
- Step
-
Execute the program until it reaches a different source line.
- Step Instruction
-
Execute the program for one machine instruction only.
- Next
-
Execute the program until it reaches the next source line,
stepping over subroutine calls.
- Next Instruction
-
Execute the program until it reaches the next machine instruction,
stepping over subroutine calls.
- Finish
-
Continue execution until selected stack frame returns.
- Continue
-
Continue execution of the program being debugged.
- Interrupt
-
Asynchronously interrupt the program being debugged. Note that depending on
the state of the program, you may stop it in low-level system code that does
not have debug information, or in some cases, not even a coherent state. Use
of breakpoints is preferable to interrupting programs. Interrupting programs
is nevertheless indispensable in some situations, for example when the
program appears to be in an infinite (or at least very time-consuming) loop.
- Command History...
-
Opens a dialog with the list of commands executed in the current session.
You can select any number of items in this list and replay the selection
automatically.
- Clear Window
-
Clears the debugger console window. This removes the recording of interchanges
between GVD and the underlying debugger, and resets the scrollbar
accordingly.
Note that most items in this menu need to access the underlying debugger
when the process is stopped, not when it is running. This means that you first
need to stop the process on a breakpoint or interrupt it, before using
the following commands. Failing to do so will result in blank windows.
- Call Stack
-
Displays/hides the Call Stack window inside the Data window.
See section The Call Stack Window for more details. Note that you can
also display or hide the call stack at the preferences level, see
section Show Call Stack.
- Threads...
-
Opens a new window containing the list of threads currently present in
the executable as reported by the underlying debugger. For each thread,
it will give information such as internal identifier, name and status.
This information is language- and debugger-dependent. You should refer to
the underlying debugger's documentation for more details.
As indicated above, the process being debugged needs to be stopped
before using this command, otherwise a blank list will be displayed.
When supported by the underlying debugger, clicking on a thread will
change the context (variables, call stack, source file) displayed by GVD,
allowing you to inspect the stack of the selected thread.
- Tasks...
-
For GDB only, this will open a new window containing the list of Ada
tasks currently present in the executable. Similarly to the thread
window, you can switch to a selected task context by clicking on it, if
supported by GDB. See the GDB documentation for the list of
items displayed for each task.
As for the thread window, the process being debugged needs to be stopped
before using this window.


- Edit Breakpoints...
-
Opens an advanced window to create any kind of breakpoint. For simple
breakpoint creation, see the description of the source window.
- Examine Memory...
-
Opens a memory viewer/editor. See section The Memory Window for more
details.
- Display Local Variables
-
Opens an item in the Data Window containing all the local variables
for the current frame.
- Display Arguments
-
Opens an item in the Data Window containing the arguments
for the current frame.
- Display Registers
-
Opens an item in the Data Window containing the machine registers
for the current frame.
- Display Any Expression...
-
Opens a small dialog letting you specify an arbitrary expression
in the Data Window. This expression can be a variable name, or a
more complex expression, following the syntax of the underlying debugger.
See the documentation of e.g gdb for more details on the syntax.
The check button Expression is a subprogram call should be enabled
if the expression is actually a debugger
command (e.g
p/x var) or a procedure call in the program being
debugged (e.g call my_proc).
- Refresh
-
Refreshes all the items displayed in the Data Window.
- GVD Manual...
-
Opens this documentation in an HTML browser (as specified in the
section HTML browser).
- About...
-
Opens a simple information box about GVD.
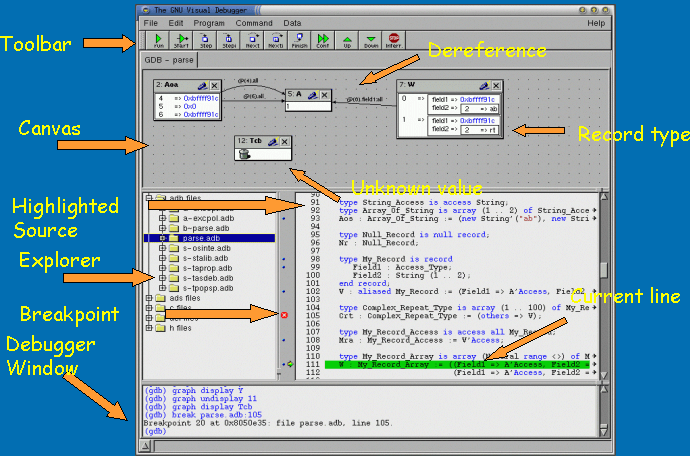
The tool bar can be detached from the main window, using the left area:
click on this left gray area, and move your mouse outside the window. The
tool bar will be detached and its form will also change from a horizontal
bar to a vertical bar with two columns.
To move it back to the main window, double click on the left area.
- Run
-
Executes the program using the arguments set previously (e.g on the command
line).
- Start
-
Same as Run, but stops at the beginning of the main subprogram.
- Step
-
Executes the program until it reaches a different source line.
- Stepi
-
Executes the program for one machine instruction only.
- Next
-
Executes the program until it reaches the next source line, stepping
over subroutine calls.
- Nexti
-
Executes the program until it reaches the next machine instruction, stepping
over subroutine calls.
- Finish
-
Continues execution until selected stack frame returns.
- Cont
-
Continues execution of the program being debugged.
- Up
-
Goes up one frame in the call stack.
- Down
-
Goes down one frame in the call stack.
- Interrupt
-
Asynchronously interrupts the program being debugged. Note that depending on
the state of the program, you may stop it in low level system code that does
not have debug information, or in some cases, not even a coherent state. Use
of breakpoints is in general preferable to interrupting programs.
The call stack window gives a list of frames corresponding to the current
execution stack for the current thread/task.
The top frame corresponds to the outermost frame where the thread is
currently stopped. This frame corresponds to the first function
executed by the current thread (e.g main if the main thread is in C).
You can click on any frame to switch to the caller's context, this will
update the display in the source window. See also the up and down
buttons in the tool bar to go up and down one frame in the call stack.
The contextual menu (right mouse button) allows you to choose which
information you want to display in the call stack window (via check buttons):
- Frame number: the debugger frame number (usually starts at 0 or 1)
- Program Counter: the low level address corresponding to the
function's entry point.
- Subprogram Name: the name of the subprogram in a given frame
- Parameters: the parameters of the subprogram
- File Location: the filename and line number information.
By default, the subprogram and parameters are displayed.
You can hide the call stack window using the menu Data->Call Stack, and
show it again using the same menu (this menu item is a check button that
can be enabled/disabled)
The data window contains all the graphic boxes that can be accessed
using the Data->Display menu items, or the data window
Display Expression... contextual menu, or the source window
Display contextual menu items, or finally the
graph command in the debugger console.
For each of these commands, a box is displayed in the data window
with the following information:

- A title bar containing:
- The number of this expression: this is a positive number starting
from 1 and incremented for each new box displayed. It represents the
internal identifier of the box.
- The name of the expression: this is the expression or variable
specified when creating the box.
- An icon representing either a flash light, or a lock.
This is a clickable icon that will change the state of the box from
automatically updated (the flash light icon) to frozen (the lock
icon).
When frozen, the value is grayed, and will not change until you change
the state. When updated, the value of the box will be recomputed each
time an execution command is sent to the debugger (e.g step, next).
- An icon representing an 'X'.
You can click on this icon to close/delete any box.
- A main area.
The main area will display the data value hierarchically
in a language-sensitive manner. The canvas knows about data structures
of various languages (e.g
C, Ada, C++) and will
organize them accordingly.
For example, each field of a record/struct/class, or each item of an
array will be displayed separately. For each subcomponent, a thin box
is displayed to distinguish it from the other components.
A contextual menu, that takes into account the current component selected
by the mouse, gives access to the following capabilities:
- Close component
-
Closes the selected item.
- Hide all component
-
Hides all subcomponents of the selected item. To select a particular field
or item in a record/array, move your mouse over the name of this
component, not over the box containing the values for this item.
- Show all component
-
Shows all subcomponents of the selected item.
- Clone component
-
Clones the selected component into a new, independant item.
- View memory at &component
-
Brings up the memory view dialog and explore memory at the address of the
component.
- Set value of component
-
Sets the value of a selected component. This will open an entry box
where you can enter the new value of a variable/component. Note that
GDB does not perform any type or range checking on the value entered.
- Update Value
-
Refreshes the value displayed in the selected item.
- Show Value
-
Shows only the value of the item.
- Show Type
-
Shows only the type of each field for the item.
- Show Value+Type
-
Shows both the value and the type of the item.
- Auto refresh
-
Enables or disables the automatic refreshing of the item upon program execution
(e.g step, next).
A contextual menu can be accessed in the canvas itself (point the mouse to
an empty area in the canvas, and click on the right mouse button) with the
following entries:
- Display Expression...
-
Open a small dialog letting you specify an arbitrary expression
in the Data Window. This expression can be a variable name, or a
more complex expression, following the syntax of the current language and
underlying debugger.
See the documentation of e.g gdb for more details on the syntax.
The check button Expression is a subprogram call should be enabled
if the expression is actually not an expression but rather a debugger
command (e.g
p/x var) or a procedure call in the program being
debugged (e.g call my_proc).
- Align On Grid
-
Enables or disables alignment of items on the grid.
- Detect Aliases
-
Enables or disables the automatic detection of shared data structures.
Each time you display an item or dereference a pointer, GVD looks at all
the items already displayed on the canvas and compares their addresses with
the address of the new item to display. If they match,
(for example if you tried to dereference a pointer to an object already
displayed). GVD will not create a new item, but it will create a link to it.
- Zoom in
-
Redisplays the items in the data window with a bigger font
- Zoom out
-
Displays the items in the data window with smaller fonts and pixmaps. This
can be used when you have several items in the window and you can't see all
of them at the same time (for instance if you are displaying a tree and
want to clearly see its structure).
- Zoom
-
Allows you to choose the zoom level directly from a menu.
All the items on the canvas have some common behavior and can be fully
manipulated with the mouse.
They can be moved freely anywhere on the canvas, simply by clicking on
them and then dragging the mouse. Note that if you are trying to move
an item outside of the visible area of the data window, the latter will
be scrolled so as to make the new position visible.
Automatic scrolling is also provided if you move the mouse while dragging
an item near the borders of the data window. As long as the mouse
remains close to the border and the button is pressed on the item,
the data window is scrolled and the item is moved. This provides an
easy way to move an item a long distance from its initial position.
Most of the items are displayed using several colors, each
conveying a special meaning. Here is the meaning assigned to all colors
(note that the exact color can be changed through the preferences
dialog; these are the default colors):

- black
-
This is the default color used to print the value of variables or
expressions.
- blue
-
This color is used for C pointers (or Ada access values), i.e. all the variables
and fields that are memory addresses that denote some other value in
memory.
You can easily dereference these (that is to say see the value pointed to)
by double-clicking on the blue text itself.
- red
-
This color is used for variables and fields whose value has changed since
the data window was last displayed. For instance, if you display an array
in the data window and then select the Next button in the toolbar, then
the elements of the array whose value has just changed will appear in red.
As another example, if you choose to display the value of local variables in
the data window (Display->Display Local Variables), then only the
variables whose value has changed are highlighted, the others are left in
black.
Several different icons can be used in the display of items. They also
convey special meanings.
- trash bin icon
-
This icon indicates that the debugger could not get the value of the
variable or expression. There might be several reasons, for instance the
variable is currently not in scope (and thus does not exist), or it might
have been optimized away by the compiler. In all cases, GVD will update the
display as soon as the variable becomes visible again.
- package icon
-
This icon indicates that part of a complex structure is currently hidden.
Manipulating huge items in the data window (for instance if the variable
is an array of hundreds of complex elements) might not be very helpful. As a
result, GVD gives you the opportunity to shrink part of the value to
save some screen space and make it easier to visualize the interesting parts
of these variables. See section hiding big items to enable or disable this
facility, and to set the threshold used to hide items automatically.
Double-clicking on this icon will expand the hidden part, and clicking on
any sub-rectangle in the display of the variable will hide that part and
replace it with that icon.
See also the description of the contextual menu to automatically show or hide
all the contents of an item. Note also that one alternative to hiding
subcomponents is to clone them in a separate item (see the contextual menu
again).

The memory window allows you to display the contents of memory by
specifying either an address, or a variable name.
To display memory contents, enter the address using the C hexadecimal notation:
0xabcd,
or else the name of a variable, e.g foo, in the Location text entry. In the
latter case, GVD will compute its address automatically. Then either press
Enter or click on the View button. This will display the memory with
the corresponding addresses in the bottom text area.
You can also specify the unit size (Byte, Halfword or Word),
the format (Hexadecimal, Decimal, Octal or ASCII), and you
can display the corresponding ASCII value at the same time.
The up and down arrows as well as the Page up and Page down
keys in the memory text area allows you to walk through the memory in
order of ascending/descending addresses respectively.
Finally, you can modify a memory area by simply clicking on the location
you want to modify, and by entering the new values. Modified values will
appear in a different color (red by default) and will only be taken into
account (i.e written to the target) when you click on the Submit changes
button. Clicking on the Undo changes or going up/down in the memory
will undo your editing.
Clicking on Close will close the memory window, cancelling your last
pending changes, if any.

The explorer window provides fast access to the files contained in the
module you want to debug (and that have been compiled with debug information).
Note that you can have multiple entries with the same file name if there
are identical file names in different places (which can be either
different files, e.g /usr/include/signal.h and
/usr/include/sys/signal.h, or identical files reached through different
source paths).
Each file can be opened (by clicking on the + icon on the left of
the file name, or double clicking on the file name, giving access to
language sensitive information such as packages, functions, tasks, etc...
You can then open each of these sections and by selecting an item,
the source editor will select and jump to this item.
Note: some items are disabled until an executable is loaded by means of the
Open Program, the Open Core Dump, or the Attach Process menu, or by means of
the corresponding commands in the debugger console.
Contextual menu:
- Hide System Files
-
Hides the files that are part of the system.
This currently only affects Ada programs compiled with GNAT, and will hide the
GNAT run-time files used by the executable.
- Reload Files
-
Recomputes the list of files. this is particularly useful when the program
uses shared libraries that are not known until the program references
them.
- Delete Files Not Found
-
Deletes the files that cannot be found on the file system. Note that this
operation can take a long time to complete.
- Show Current File
-
Highlights the file containing the current execution point.
The source window is composed of two main areas. The first is a small
column on the left containing the following information:
- Lines with code
-
In this area, blue dots are present next to lines for which the debugger
has debug information, in other words, lines that have been compiled with
debug information and for which the compiler has generated some code.
Currently, GVD does not check whether you try to set a breakpoint on a dotted
line or not, and it will simply send the breakpoint command to the underlying
debugger. This will usually (e.g in the case of gdb) result in setting a
breakpoint at the closest location that matches the file and line that you
specified.
- Current line executed
-
This is a green arrow showing the line about to be executed.
- Lines with breakpoints
-
For lines where breakpoints have been set, a red mark is displayed on top
of the blue dot for the line. You can add and delete
breakpoints by clicking on this area (the first click will set a breakpoint,
the second click will remove it).

The second area in the source window is a text window on the right that
displays the source files, with syntax highlighting.
If you leave the cursor over a variable, a tooltip will
appear showing the value of this variable. Automatic tooltips can be
disabled in the section preferences menu.
The contextual menu of the source window contains the following entries.
Note that these entries are dynamic, that is they will apply to the entity
found under the cursor when the menu is displayed (depending on the current
language). However, if a selection has been made in the source window, the
text of the selection will be used instead. This allows you to display
more complex expressions easily (for example by adding some comments to your
code with the complex expressions you want to be able to display in the debugger).
- Print selection
-
Prints the selection (or by default the name under the cursor) in the
debugger console.
- Display selection
-
Displays the selection (or by default the name under the cursor) in the
data window. The value will be automatically refreshed each time the process
state changes (e.g after a step or a next command). To freeze the display
in the canvas, you can either click on the corresponding icon in the data
window, or use the contextual menu for the specific item (see
section The Data Window for more information).
- Print selection.all
-
Dereferences the selection (or by default the name under the cursor) and
prints the value in the debugger console.
- Display selection.all
-
Dereferences the selection (or by default the name under the cursor) and
displays the value in the data window.
- View memory at &selection
-
Brings up the memory view dialog and explores memory at the address of the
selection.
- Set Breakpoint on Line xx
-
Sets a breakpoint on the line under the cursor, in the current file.
- Set Breakpoint on selection
-
Sets a breakpoint at the beginning of the subprogram named selection
- Continue Until Line xx
-
Contines execution (the program must have been started previously) until
it reaches the specified line.
- Show Current Location
-
Jumps to the current line of execution. This is particularly useful after
navigating through your source code.
- Display Line Numbers
-
Enables or disable the display of line numbers on the left of the source
editor.
- Show Lines with Code
-
Enables or disables the display of lines with code, as described above.
- Show...
-
A submenu composed of the following options:
- Source Code
-
Shows only the source code.
- Asm Code
-
Shows only the assembly code around the current execution point.
See section The Assembly Window for more details.
- Asm and Source
-
Shows both the source code and the assembly window at the same time.
It is often convenient to look at the assembly code for the subprogram
or source line you are currently debugging. If the underlying debugger
provides this kind of support (gdb does, but not jdb), then GVD will
fully support that kind of debugging.
You can access the assembly window by right-clicking in the source
window, and selecting one of the menus "Show Asm Code" or "Show Asm and
Source", the later will allow you to see both the source code and the
matching assembly code.

The current assembly instruction is, as usual, highlighted with a green
arrow on its left. The instructions corresponding to the current source
line are highlighted in red by default. This allows you to easily see
where the program counter will point to, once you have pressed the "Next"
button on the toolbar.
Moving to the next assembly instruction is done through the "Nexti"
(next instruction) button in the toolbar. If you choose "Stepi"
instead (step instruction), this will also jump to the subprogram
being called.
For efficiency reasons, GVD will only display a small part of the
assembly code around the current instruction.
You can specify in the section preferences menu how many instructions
are displayed by default. Also, you can easily
display the instructions immediately preceding or following the
currently displayed instructions by pressing one of the Page up or
Page down keys, or by using the contextual menu in the assembly
window.
A critical requirement for debugging at the assembly level is the
ability of displaying the contents of machine registers.
When the debugger supports it
(as gdb does), you can select the Data->Display Registers menu
to get an item in the canvas that will show the current contents of each
machine register, and that will be updated every time one of them changes.
You might however choose to look at a single register. Although this is
dependent on the debugger you are currently using, you can do this with
gdb by selecting the Data->Display Any Expression, entering
something like
output /x $eax
in the field, and selecting the toggle button "Expression is a subprogram
call". This will create a new canvas item that will be refreshed every
time the value of the register (in this case eax) changes.
This is the text window located at the bottom of the main window.
In this console, you have direct access to the underlying debugger,
and can send commands (you need to refer to the underlying debugger's
documentation, but usually typing help will give you an overview of
the commands available).
If the underlying debugger allows it, pressing the TAB key in this
window will provide completion for the command that is being typed (or for
its arguments).
GVD also adds a number of commands to the debugger to provide a simple
text interface to some of its graphical features. These commands, as documented
below, enable you to create scripts that automatically change the graphical
aspect of GVD. They also permit, through the use of the --tty command
line option, a better integration of GVD into other integrated environments
and editors like GNU Emacs.
Here is the complete list of such commands. The arguments between square
brackets are optional and can be omitted.
- graph (print|display) expression [dependent on display_num] [link_name name]
-
This command creates a new item in the canvas, that shows the value of
Expression. Expression should be the name of a variable, or one
of its fields, that is in the current scope for the debugger.
The command
graph print will create a frozen item, that is not
automatically refreshed when the debugger stops, whereas graph display
displays an automatically refreshed item.
The new item is associated with a number, that is visible in its title bar.
These numbers can be used to create links between the items, using the
second argument to the command, dependent on. The link itself (ie the
line) can be given a name that is automatically displayed, using the third
argument.
- graph (print|display) `command`
-
This command is similar to the one above, except it should be used to
display the result of a debugger command in the canvas.
For instance, if you want to display the value of a variable in hexadecimal
rather than the default decimal with gdb, you should use a command like:
graph display `print /x my_variable`
This will evaluate the command between back-quotes every time the debugger
stops, and display this in the canvas. The lines that have changed will
be automatically highlighted (in red by default).
This command is the one used by default to display the value of registers
for instance.
- graph (enable|disable) display display_num [display_num ...]
-
This command will change the refresh status of items in the canvas. As
explained above, items are associated with a number visible in their title
bar.
Using the
graph enable command will force the item to be automatically
refreshed every time the debugger stops, whereas the graph disable
command will freeze the item.
- graph undisplay display_num
-
This command will remove an item from the canvas
- view (source|asm|source_asm)
-
This command indicates what should be displayed in the source window.
The first option indicates that only the source code should be visible,
the second one specifies that only the assembly code should be visible,
and the last one indicates that both should be displayed.
This is the line located at the bottom of the main window. This area
will contain information about events, and errors such as parsing errors.
After a time out (that can be changed in the preferences menu), each
message disappears and is added to the history of messages that can be
accessed using the arrow located at the left of the status line.
To have GVD run as an inferior in other front ends, you can either set up
your debugger front end such that gvd --tty is invoked instead of
the inferior debugger, or use GVD as a library.
When GVD is invoked using the --tty option, it enables its TTY
interface, taking additional debugger commands from standard input and
forwarding debugger output to standard output, just as if the inferior
debugger had been invoked directly. All remaining GVD functionalities stay
unchanged. Note that the --tty option is currently not supported
on Windows systems.
The --tty option also implies the GDB -fullname option, when
GDB is used as the underlying debugger.
You may also invoke gvd --tty directly, entering GVD commands from
your TTY, or use GVD as the end of a pipe, controlled by a remote program.
Be aware, however, that the TTY interface does not support line editing and
command completion. Also, do not try to run GVD with GVD as inferior
debugger.
Select Ada->Project->Edit Current, go in the [Ada Menu]
section, in the Debugging the application: field, enter
gvd --tty ${main}.
Save. Then launch the debugging session by using the menu
Ada->Debug.
In the source window, you can display variables graphically using the
contextual menu on top of a variable, or after selecting an expression.
The display will be done in GVD's canvas window.
If you activate the option in the menu Ada->Options->Tight Integration
with GVD, then a new frame from Emacs will be swallowed directly in
the GVD window (This is currently specific to Unix systems). This means
that the source window of GVD will be completely replaced by the Glide
window, and thus will be a full editor. It also provides cross-references,
which might help you debug your code.
If you are not using project files with Glide, you might want to
use the following lisp function to automatically start gvd on your
executable, with Glide used as the source editor. Just copy the following
code to your `~/.emacs' configuration file (create it if it doesn't
exist).
   (auto-load 'ada-gdb-application "ada-mode" "" t)
   (defun gvd (executable-name)
     "Start gvd on EXECUTABLE-NAME, with emacs as the source window."
     (interactive "FExecutable: ")
     (let ((ada-tight-gvd-integration t)
	   (ada-prj-default-debugger  "gvd"))
       (ada-gdb-application nil executable-name)))
Use M-x gdb to start a debugging session. At the prompt, enter
gvd --tty and the name of the program to be debugged. Process as
usual.
A file `gvd.el' is provided with the GVD binaries and in the
`distrib/' directory of the GVD sources.
This file provides a function called gvd,
that can be used just like the standard gdb command, but that
adds some special arguments to the command line so that an Emacs frame
is automatically swallowed inside GVD and used as the source editor (see
description in section Using GVD with Glide).
Simply load that file in Emacs, with a command like
(load "/complete/path/gvd.el")
in your `.emacs' configuration file, and then use the command
M-x gvd to launch GVD.
In XEmacs 21 and later, select Tools->Debug (GDB). At the prompt,
enter gvd --tty and the name of the program to be debugged.
Proceed as usual.
GVD can also be used as a library. Note that this is still work in
progress. The interface provided by GVD to other programs can
be found in the file `gvd-api.ads', and `gvd-api.h'.
Note that to integrate GVD code in Ada applications, the recommended
way is to use the various high-level packages provided by GVD directly.
The `gvd-api.ads' file is provided mainly for integrating GVD with other
languages. This API is provided as a C API, so that any language that can
interface with C can use it. For more information, refer directly to
the `gvd-api.ads' file.
Future development plans of GVD include transforming GVD into a Corba
object, so that it can be used easily by other applications in any
language, and in particular in the context of the GNOME framework.
It is possible to have the inferior debugger run on a remote host. This is
useful when the remote host has a slow network connection or when GVD is
available on the local host only.
Furthermore, the inferior debugger may support debugging a program on a remote
host. This is useful when the inferior debugger is not available on the remote
host - for instance, because the remote system does not have a general-purpose
operating system powerful enough to run a full featured debugger. When
developing in a cross environment (e.g VxWorks, Lynx OS), you will be in such
situation.
To debug a program running on a remote machine you have two main options:
either run GVD on the remote machine, using the remote capabilities of the X
windowing system;
or run GVD on the host machine, and run the underlying debugger on the remote
machine.
For the first option, you must open a shell on the remote machine (using e.g
telnet or rlogin), set the DISPLAY environment variable to the
value of your local display, and launch gvd from your remote machine.
For example, assuming your local machine is called local, and your display
is the default display local:0, your remote machine is called remote.
you can do the following (assuming you are using an sh-like shell):
$ rlogin remote
$ DISPLAY=local:0
$ export DISPLAY
$ gvd
You also need to ensure that remote is allowed to access local:0 by
e.g using the xhost utility on Unix.
For the second option, gvd will internally use the standard rsh and
rcp utilities. These are standard tools available on all Unix systems and
on Windows NT/2000 as well.
First make sure that rsh/rcp can be used from your local to your remote machine
without having to enter a password. This is usually done via the configuration
of a .rhosts file in your remote home directory that will typically look
like:
local user-name
local is the name of the local machine you want to rlogin from, and the .rhosts
file needs to be present in the home directory on the remote machine.
To check whether you can use gvd in remote mode, try the following, using a
shell window on your local machine:
$ rsh remote gdb
This should launch gdb on the remote machine.
Note that on some systems, rsh is called differently. In particular under
HPUX, the remote shell capability is called remsh. For those systems, and
also in order to use other remote utilities such as ssh/scp, you can change
the default remote shell and copy by using the section helpers menu.
After ensuring that you have the proper setup in place, to run the debugger on
a remote host remote, either invoke GVD as
gvd --host 'remote' remote-program
or use the File->New Debugger... menu in GVD.
If you need to use a different username on the remote host, you can
replace remote by user@remote where user is the username on the
remote machine, and remote is the remote machine, as previousely explained.
To verify that this is supported by your version of rsh, try the
following:
$ rsh user@remote gdb
If this does not work, you can create a simple script that transforms
user@remote into the proper syntax, e.g. remote -l user and
specify this script as the default remote shell and copy programs.
There are a few caveats to be aware of in remote mode:
The remote debugger is started in your remote home directory. Hence, you must
specify an absolute path name for remote-program (or a path name relative
to your remote home directory). The same applies to remote core files.
Also, be sure to specify a remote process id when debugging a running program.
To access files remotely, GVD will first try to read the files locally,
assuming that you have the remote files mounted locally at the same
location (using e.g NFS+symbolic links, or Samba). If GVD it cannot find the
files locally, it will then try to copy the files from the remote machine,
using rcp. As for rsh, you need to make sure that rcp can be called without
having to enter a password, and you can also replace rcp by similar remote
copy utilities such as scp. Note that the file
selection dialogs (change directory, open file, ...) will scan the local
directory, so you will need to know in advance the complete path if your
remote files are not mounted on your local host.
The GDB debugger allows you to run the debugger program on a remote
machine (called program host) while GDB runs on the local machine.
The section Remote debugging in the GDB documentation contains all the
details. Basically, the following steps are required:
Transfer the executable to the remote target.
Optionally start gdbserver on the remote target (e.g on Lynx OS). This
is not needed for environments such as VxWorks.
Start GVD using a properly configured cross GDB, e.g powerpc-wrs-vxworks-gdb
for a GDB configured for VxWorks PowerPC and specify the name of the remote
target, as well as the protocol used to communicate with it. To specify
the cross-GDB and the remote target, you can use either the --debugger and
--target command line options, e.g:
gvd --debugger powerpc-wrs-vxworks-gdb --target my_target:wtx
or using the Debugger Name, Program Host and Protocol entries in
the File->New Debugger menu item.

You can also combine GVD remote mode and GDB remote mode, running
GVD, GDB and the debugged program each on a different machine.
Usage:
   gvd [options...] executable-file
       [--dargs [debugger options]] [--pargs [program options]]
The options recognized by GVD are:
- --debugger DEBUG
-
use DEBUG as the underlying debugger.
- --jdb
-
assume a Java debugger. This option is currently not fully supported.
- --host HOST
-
Run inferior debugger on HOST. See
section Using GVD with a Remote Debugger for more information.
- --target TARG:PRO
-
Load program on machine TARG using protocol PRO.
Note that TARG can contain the
: character for e.g specifying the
port number. The last colon will be used by GVD as the separator between
the target and the protocol. For instance, assuming you want to connect
to a board named bare on port 1234 using the remote protocol, you
would specify:
gvd --target bare:1234:remote
See section Using GVD with a Remote Program for more information.
- --log-level [0-4]
-
Set level of logging (Default is 3).
This option can be useful when reporting bugs in GVD, in which case the
maximum level of logs (4) gives more details, but will also generate
more disk activity, which can slow down GVD significantly if the
log file is located through a network disk.
- --editor-window=xid
-
Use xid as the editor X window id.
GVD takes advantage of this option by integrating the specified window
as the source editor.
This option is not currently supported on Windows.
Note that the best way to use this option is directly through Glide or Emacs,
as explained in section Using GVD with Glide. Glide will automatically pass the
correct xid value.
- --tty
-
Use controlling tty as the debugger console.
This option is very useful for integrating GVD in other debugger front ends
(e.g Emacs), since in this mode, GVD appears as the underlying debugger to
the caller. See section Integrating GVD for more details.
This option is not currently supported on Windows.
- --version
-
Show the GVD version and exit.
The --dargs section let you specify an arbitrary number of options
to pass to the underlying debugger.
Similarly, the --pargs section let you specify options to pass to the
debugged program.
For example, if you want to pass the --nx option to GDB, and the
options --file foo --version to the debugged program my_code
you would launch GVD as follows:
gvd my_code --dargs --nx --pargs --file foo --version
The following environment variables can be set to override some default
settings in GVD:
- `GVD_ROOT.'
-
Override the default root directory specified when GVD
is built (during the configure process, see the file
INSTALL in
the GVD sources for more details) to access information such as the location
of the translation files.
- `GVD_HOME.'
-
Override the variable HOME if present. All the configuration files and
directories used by GVD are either relative to $HOME/.gvd (%HOME%\.gvd under
Windows) if GVD_HOME is not set, or to $GVD_HOME/.gvd (respectively
%GVD_HOME%\.gvd) if set.
- `GVD_EDITOR.'
-
Override the default editor as found in the section helpers menu.
- `$HOME/.gvd'
-
GVD state directory
- `$HOME/.gvd/log'
-
Log file created automatically by GVD. This log file contains all the input
and output exchanged between GVD and the underlying debugger. You can
specify the level of logs (from no log to very verbose) by using the
--log-level command line option. Using a high level of log can be
useful to track communication problems between GVD and the underlying debugger,
but will slow down GVD if $HOME is located on a network disk.
- `$HOME/.gvd/preferences'
-
Contains all the preferences in XML format, as specified in the
section preferences menu.
- `$HOME/.gvd/window_settings'
-
Contains all the settings of the windows (window sizes, pane
offset) in XML format. These settings are saved automatically when quitting
GVD, and loaded automatically at start up. To reset the settings, simply
remove this file.
- `$HOME/.gvd/sessions'
-
Directory containing the GVD sessions.
- `$HOME/.gvd/sessions/session'
-
Each file in the
sessions directory represents a particular session
saved by the user.
- `$HOME/.gdbinit GDB initialization file'
-
If command output is sent to the debugger console, it is impossible for GVD to distinguish between the output of the debugged program and the output
of the inferior debugger. This problem can be avoided by launching the
program separately and then attaching it in GVD.
Output that confuses GVD includes:
- Primary debugger prompts (e.g '(gdb) ')
- Secondary debugger prompts (e.g '>')
- Confirmation prompts (e.g '(y or n)')
If your program outputs any of these strings, you should run it in the
separate execution window.
If the inferior debugger changes the default TTY settings, for instance
through a stty command in its initialization file, GVD will likely
become confused. The same applies to debugged program which change the
default TTY settings.
Some GDB settings are essential for GVD to work correctly. These settings
with their correct values are:
- set height 0
- set width 0
- set verbose off
- set prompt (gdb)
GVD sets these values automatically when invoking GDB; if these values
are changed, there may be some malfunctions, especially in the data
display.
If you encounter a bug in GVD, you can report it to
mailto:report@gnat.com if you are a supported user (to become a
supported user, contact mailto:sales@gnat.com), or to the
public gvd development list (mailto:gvd-devel@lists.act-europe.fr).
Please try to include a detailed description of the problem, including
sources to reproduce it if possible, and/or a scenario describing the
actions performed to reproduce the problem. Saving your session and
the log file (see section log file) can help automate this process.
This chapter includes the answers to some questions that are
frequently asked by people trying to use GVD for specific tasks. Some
of the answers are not specific to GVD itself, but rather to the
underlying debugger.
- My Ada program seems to fail during elaboration. How can I debug it ?
- If your program was compiled with GNAT, the main program is
generated by the binder. This program is an ordinary Ada (or C if the
@option{-C} switch was used) program, compiled in the usual manner,
and fully debuggable provided that the @option{-g} switch is used on
the @command{gnatlink} command (or -g is used in the
@command{gnatmake} command itself).
The name of this package containing the main program is
`b~xxx.ads/adb' where xxx is the name of the Ada main unit given
in the gnatbind command, and you can edit and debug this file in the
normal manner. You will see a series of calls to the elaboration
routines of the packages, and you can debug these in the usual manner,
just as if you were debugging code in your application.
- How can I debug the Ada run-time library ?
- The run time distributed in binary versions of GNAT hasn't been
compiled with debug information. Thus, it needs to be recompiled
before you can actually debug it.
The simplest is to recompile your application by adding the switches
@option{-a} and @option{-f} to the @command{gnatmake} command
line. This extra step is then no longer required, assuming that you
keep the generated object and ali files corresponding to the GNAT run time
available.
Another possibility on unix systems is to use the file `Makefile.adalib'
that can be found in the adalib directory of your GNAT installation and
specify e.g @option{-g -O2} for the @option{CFLAGS} switches.
This document was generated on January, 28 2002 using
texi2html 1.56k.